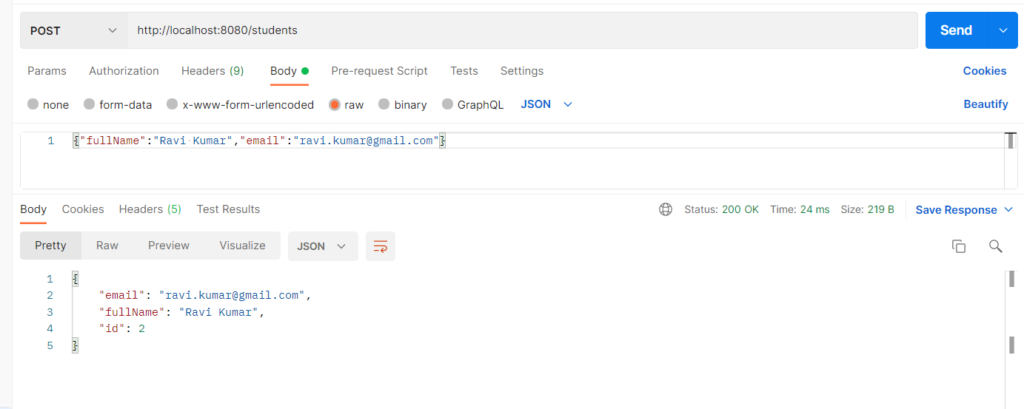
1. Creating a Spring Boot Project
Spring Boot projects are typically generated using Spring Initializr, a web-based (or IDE-integrated) tool that lets you select your build tool, language, Spring Boot version, project metadata, and dependencies, then generates a ready-to-run project skeleton. This avoids manually setting up folder structures, pom.xml entries, and boilerplate classes by hand.
Ways to generate a project:
- Web UI at start.spring.io
- IDE plugins (IntelliJ IDEA’s “New Project → Spring Initializr”, Spring Tool Suite, VS Code’s Spring Boot extension)
- Command line via curl or the Spring Boot CLI
Different choices when generating a project:
- Build tool: Maven or Gradle
- Language: Java, Kotlin, or Groovy
- Spring Boot version
- Project metadata: Group (reverse domain, e.g. net.codejava), Artifact (project name), Package name
- Packaging: Jar (embedded server, standalone) or War (deployed to external server)
- Java version
- Dependencies: starters like Spring Web, Spring Data JPA, MySQL Driver, Spring Boot DevTools, etc.
Experiment: Create a “Student” Application Using Spring Initializr
To generate a Spring Boot project named student-app using Spring Initializr and explore the resulting project files.
Step 1: Configure the Project on Spring Initializr
Go to start.spring.io and set:
- Project: Maven
- Language: Java
- Spring Boot version: 3.2.x
- Group: net.codejava
- Artifact: student-app
- Name: student-app
- Package name: net.codejava.studentapp
- Packaging: Jar
- Java: 17
- Dependencies: Spring Web, Spring Data JPA, MySQL Driver
Click Generate to download the ZIP, then extract and import it into your IDE as a Maven project.
Step 2: Generated Project Structure
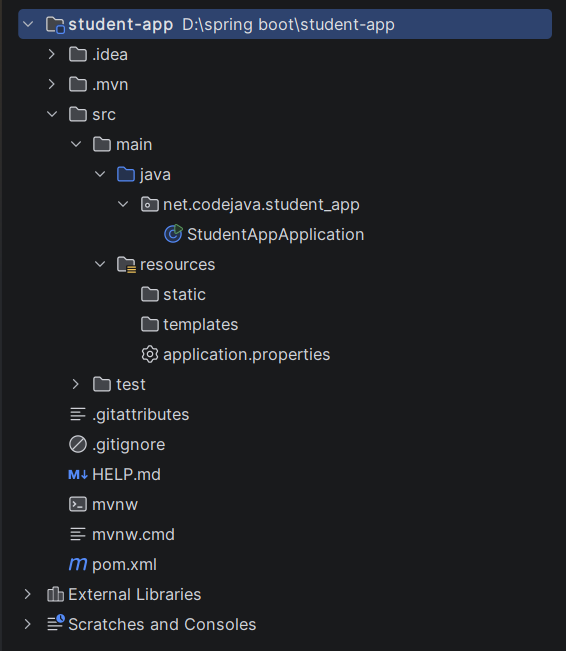
Step 3: Explore pom.xml
<?xml version="1.0" encoding="UTF-8"?>
<project xmlns="http://maven.apache.org/POM/4.0.0" xmlns:xsi="http://www.w3.org/2001/XMLSchema-instance"
	xsi:schemaLocation="http://maven.apache.org/POM/4.0.0 https://maven.apache.org/xsd/maven-4.0.0.xsd">
	<modelVersion>4.0.0</modelVersion>
	<parent>
		<groupId>org.springframework.boot</groupId>
		<artifactId>spring-boot-starter-parent</artifactId>
		<version>4.1.1</version>
		<relativePath/> <!-- lookup parent from repository -->
	</parent>
	<groupId>net.codejava</groupId>
	<artifactId>student-app</artifactId>
	<version>0.0.1-SNAPSHOT</version>
	<name/>
	<description/>
	<url/>
	<licenses>
		<license/>
	</licenses>
	<developers>
		<developer/>
	</developers>
	<scm>
		<connection/>
		<developerConnection/>
		<tag/>
		<url/>
	</scm>
	<properties>
		<java.version>17</java.version>
	</properties>
	<dependencies>
		<dependency>
			<groupId>org.springframework.boot</groupId>
			<artifactId>spring-boot-starter-data-jpa</artifactId>
		</dependency>
		<dependency>
			<groupId>org.springframework.boot</groupId>
			<artifactId>spring-boot-starter-webmvc</artifactId>
		</dependency>

		<dependency>
			<groupId>com.mysql</groupId>
			<artifactId>mysql-connector-j</artifactId>
			<scope>runtime</scope>
		</dependency>
		<dependency>
			<groupId>org.springframework.boot</groupId>
			<artifactId>spring-boot-starter-data-jpa-test</artifactId>
			<scope>test</scope>
		</dependency>
		<dependency>
			<groupId>org.springframework.boot</groupId>
			<artifactId>spring-boot-starter-webmvc-test</artifactId>
			<scope>test</scope>
		</dependency>
	</dependencies>

	<build>
		<plugins>
			<plugin>
				<groupId>org.springframework.boot</groupId>
				<artifactId>spring-boot-maven-plugin</artifactId>
			</plugin>
		</plugins>
	</build>

</project>
Step 4: application.properties
spring.application.name=student-app
spring.port=8080
spring.datasource.url=jdbc:mysql://localhost:3306/sys
spring.datasource.username=root
spring.datasource.password=password
spring.jpa.hibernate.ddl-auto=update
spring.jpa.show-sql=true
Step 5: Examine the Generated Main Class
package net.codejava.student_app;

import org.springframework.boot.SpringApplication;
import org.springframework.boot.autoconfigure.SpringBootApplication;

@SpringBootApplication
public class StudentAppApplication {

	public static void main(String[] args) {
		SpringApplication.run(StudentAppApplication.class, args);
	}

}
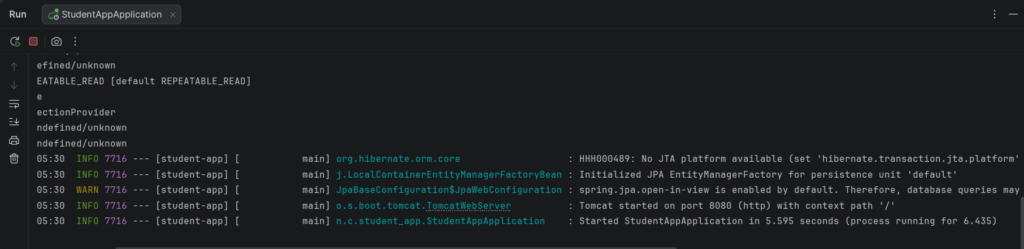
Step 6: Run the application
Click on StudentAppApplication.java and Run the StudentAppApplication.java.
2. Spring Boot Application Structure
Every Spring Boot project follows a standard, convention-based structure that both Maven/Gradle and Spring Boot rely on to build and run the application correctly.
Components
-
Main class (
@SpringBootApplication): Entry point of the application; bootstraps the Spring context, triggers auto-configuration and component scanning. -
src/main/java: Contains all application source code — controllers, services, repositories, entities. -
src/main/resources: Non-Java resources:application.properties/application.ymlfor configuration,static/for public assets (CSS, JS, images), andtemplates/for server-side view templates (Thymeleaf, etc.). -
src/test/java: Unit and integration test classes, mirroring the main package structure. -
pom.xml: Maven build file: project metadata, parent POM (spring-boot-starter-parent), dependencies, plugins (e.g.,spring-boot-maven-pluginfor packaging an executable JAR). -
mvnw/mvnw.cmd: Maven Wrapper scripts — let the project build without a separately installed Maven. -
target/(generated): Compiled classes and the final packaged JAR/WAR, created after a build.
Experiment: Build a Student Application and Identify Each Component’s Role
To extend the student-app project with a basic Student entity and REST endpoint, and map each project component to its role.
Architecture
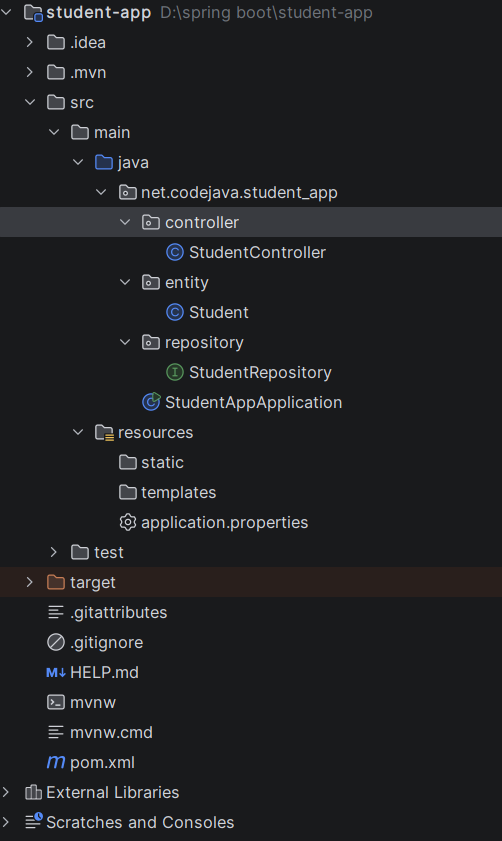
Step 1: Create the Entity (src/main/java)
import jakarta.persistence.*;

@Entity
@Table(name = "students")
public class Student {

    @Id
    @GeneratedValue(strategy = GenerationType.IDENTITY)
    private Integer id;

    private String fullName;
    private String email;

    // getters and setters
    public Integer getId() { return id; }
    public void setId(Integer id) { this.id = id; }
    public String getFullName() { return fullName; }
    public void setFullName(String fullName) { this.fullName = fullName; }
    public String getEmail() { return email; }
    public void setEmail(String email) { this.email = email; }
}
Step 2: Create the Repository
package net.codejava.student_app.repository;

import net.codejava.student_app.entity.Student;
import org.springframework.data.jpa.repository.JpaRepository;

public interface StudentRepository extends JpaRepository<Student, Integer> {
}
Step 3: Create the Controller
package net.codejava.student_app.controller;

import net.codejava.student_app.entity.Student;
import net.codejava.student_app.repository.StudentRepository;
import org.springframework.beans.factory.annotation.Autowired;
import org.springframework.web.bind.annotation.*;

import java.util.List;

@RestController
@RequestMapping("/students")
public class StudentController {

    @Autowired
    private StudentRepository studentRepository;

    @GetMapping
    public List<Student> getAllStudents() {
        return studentRepository.findAll();
    }

    @PostMapping
    public Student addStudent(@RequestBody Student student) {
        return studentRepository.save(student);
    }
}
Step 4: Run the Application
Click on StudentAppApplication.java and Run the StudentAppApplication.java.