
JDBC (Java Database Connectivity) is a Java API used to connect a Java application with an H2 Database and execute SQL statements. In the non-Maven approach, we manually download the H2 Database JDBC driver JAR and include it in the classpath while compiling and running the Java program. H2 provides a JDBC driver that allows Java applications to communicate with H2 databases.
For this example, we will use an embedded H2 database, where the database is stored locally.
Example database:
jdbc_demo
The JDBC URL will be:
jdbc:h2:./jdbc_demo
Step 1: Install and Set Up H2 Database
H2 can be used as an embedded database, so a separate database server is not required for this example.
Download H2 from the official H2 website:
H2 Database – Official Website
For the classpath approach, the most important file is the H2 JDBC driver JAR.
Example:
h2-2.x.x.jar
The exact version depends on the H2 release you download.
Step 2: Download the H2 JDBC Driver
Go to the official H2 download page:
Download the H2 database package.
After extracting the package, locate the JAR file:
h2-2.x.x.jar
For this example, assume:
h2-2.x.x.jar
This JAR contains the H2 JDBC driver.
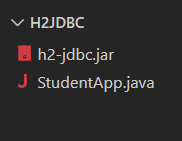
Step 3: Create the Project Folder Structure
Create the following folders:
H2JDBC/
│
├── h2-2.x.x.jar
│
├── StudentApp.java
Step 4: Create the Database Table
For an embedded H2 database, we can create the database and table directly from the Java program.
The database URL is:
jdbc:h2:./jdbc_demo
Step 5: Write the JDBC Program
import java.sql.Connection;
import java.sql.DriverManager;
import java.sql.ResultSet;
import java.sql.Statement;

public class StudentApp {

    public static void main(String[] args) {

        try {

            // Load H2 JDBC Driver
            Class.forName("org.h2.Driver");

            // Create Connection
            Connection con = DriverManager.getConnection(
                "jdbc:h2:./jdbc_demo",
                "sa",
                ""
            );

            // Create Statement
            Statement st = con.createStatement();

            // Create student table
            st.executeUpdate(
                "CREATE TABLE IF NOT EXISTS student (" +
                "id INT PRIMARY KEY, " +
                "name VARCHAR(50))"
            );

            // Insert sample data
            st.executeUpdate(
                "MERGE INTO student KEY(id) " +
                "VALUES (1, 'Raja')"
            );

            st.executeUpdate(
                "MERGE INTO student KEY(id) " +
                "VALUES (2, 'Ram')"
            );

            // Execute Query
            ResultSet rs = st.executeQuery(
                "SELECT * FROM student"
            );

            // Display Results
            while (rs.next()) {

                System.out.println(
                    rs.getInt("id") + " " +
                    rs.getString("name")
                );
            }

            // Close Resources
            rs.close();
            st.close();
            con.close();

        } catch (Exception e) {
            e.printStackTrace();
        }
    }
}
Step 6: Open Command Prompt or PowerShell
Navigate to the project folder.
For example:
cd D:\H2JDBC
Step 7: Compile Using the Classpath
Compile the Java program:
javac -classpath “.;D:\H2JDBC\h2-jdbc.jar” StudentApp.java
Run the program using:
java -classpath “.;D:\H2JDBC\h2-jdbc.jar” StudentApp
Execution and Output:
PS D:\H2JDBC> javac -classpath ".;D:\H2JDBC\h2-jdbc.jar" StudentApp.java
PS D:\H2JDBC> java -classpath ".;D:\H2JDBC\h2-jdbc.jar" StudentApp
1 Raja
2 RamCode language: CSS (css)