
JDBC (Java Database Connectivity) is a Java API used to connect a Java application with a Microsoft SQL Server Database and execute SQL statements. In the non-Maven approach, we manually download the Microsoft JDBC Driver for SQL Server JAR and include it in the classpath while compiling and running the Java program. The Microsoft JDBC Driver for SQL Server allows Java applications to communicate with Microsoft SQL Server using the standard JDBC API.
Step 1: Install and Start Microsoft SQL Server
Make sure Microsoft SQL Server is installed and running.
You can use:
- SQL Server Developer Edition
- SQL Server Express
- SQL Server Standard/Enterprise
Example connection details:
Host : localhost
Port : 1433
Database : jdbc_demo
Username : sa
Password : password
The default TCP port for SQL Server is commonly 1433, although your SQL Server instance may use a different port.
For a named SQL Server instance, the connection configuration can be different.
Step 2: Download the Microsoft JDBC Driver for SQL Server
Go to Microsoft’s official JDBC driver documentation:
Microsoft JDBC Driver for SQL Server – Official Documentation
Download the Microsoft JDBC Driver for SQL Server.
The downloaded package contains a JAR file similar to:
mssql-jdbc-13.x.x.jre11.jar
or a version appropriate for your Java version.
For this example, assume:
mssql-jdbc-13.x.x.jre11.jar
The exact version and JAR filename may change with the current Microsoft JDBC Driver release.
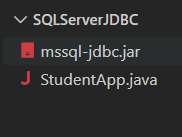
Step 3: Create the Project Folder Structure
Create the following folders:
SQLServerJDBC/
│
├── mssql-jdbc-13.x.x.jre11.jar
│
├── StudentApp.java
Step 4: Create the Database Table
Before running the Java program, create a database in SQL Server.
Open SQL Server Management Studio (SSMS) or another SQL Server client and execute:
CREATE DATABASE jdbc_demo;
Select the database:
USE jdbc_demo;
Create the student table:
CREATE TABLE student (
id INT PRIMARY KEY,
name VARCHAR(50)
);
Insert sample data:
INSERT INTO student VALUES (1, 'Raja');
INSERT INTO student VALUES (2, 'Ram');Code language: PHP (php)Step 5: Write the JDBC Program
import java.sql.Connection;
import java.sql.DriverManager;
import java.sql.ResultSet;
import java.sql.Statement;

public class StudentApp {

    public static void main(String[] args) {

        try {

            // Load Microsoft SQL Server JDBC Driver
            Class.forName(
                "com.microsoft.sqlserver.jdbc.SQLServerDriver"
            );

            // Create Connection
            Connection con = DriverManager.getConnection(
                "jdbc:sqlserver://localhost:1433;" +
                "databaseName=jdbc_demo;" +
                "encrypt=false",
                "sa",
                "password"
            );

            // Create Statement
            Statement st = con.createStatement();

            // Execute Query
            ResultSet rs = st.executeQuery(
                "SELECT * FROM student"
            );

            // Display Results
            while (rs.next()) {

                System.out.println(
                    rs.getInt("id") + " " +
                    rs.getString("name")
                );
            }

            // Close Resources
            rs.close();
            st.close();
            con.close();

        } catch (Exception e) {
            e.printStackTrace();
        }
    }
}
Step 6: Open Command Prompt or PowerShell
Navigate to the project folder.
For example:
cd D:\SQLServerJDBC
Step 7: Compile Using the Classpath
Compile the Java program:
javac -classpath “.;D:\SQLServerJDBC\mssql-jdbc.jar” StudentApp.java
Run the program using:
java -classpath “.;D:\SQLServerJDBC\mssql-jdbc.jar” StudentApp
Execution and Output:

PS D:\SQLServerJDBC> javac -classpath ".;D:\SQLServerJDBC\mssql-jdbc.jar" StudentApp.java
PS D:\SQLServerJDBC> java -classpath ".;D:\SQLServerJDBC\mssql-jdbc.jar" StudentApp
1 Raja
2 RamCode language: CSS (css)