Spring Boot is an extension of the Spring Framework that simplifies the process of building stand-alone, production-grade Spring applications. It removes the need for extensive XML configuration and boilerplate setup that traditional Spring applications required.
Why Spring Boot is used:
- Auto-configuration – automatically configures Spring and third-party libraries based on the dependencies present in the project, reducing manual setup.
- Embedded servers – ships with embedded Tomcat/Jetty/Undertow, so applications can run as standalone JARs without deploying to an external server.
- Starter dependencies – curated dependency bundles (e.g., spring-boot-starter-web, spring-boot-starter-data-jpa) that pull in compatible library versions automatically.
- Production-ready features – built-in support for metrics, health checks, and externalized configuration via Spring Boot Actuator.
- No XML configuration – uses Java-based and annotation-based configuration instead of verbose XML files.
- Rapid development – lets developers go from zero to a running REST endpoint in minutes.
How it simplifies Spring development:
Traditional Spring required manually wiring beans, configuring a DispatcherServlet, setting up a web server, and managing dependency versions by hand. Spring Boot’s @SpringBootApplication annotation combines @Configuration, @EnableAutoConfiguration, and @ComponentScan into one entry point, and the embedded server means there’s nothing extra to install or deploy — you just run the JAR.
Hands-on Experiment: Create a Basic Spring Boot Application with a “Hello Spring Boot” Endpoint
To create a simple Spring Boot application and expose a REST endpoint that returns a “Hello Spring Boot” message.
Software/Tools Required
- Java JDK 17 (or 11+)
- Spring Boot 3.x (or 2.7.x)
- Maven (or Gradle)
- IDE (IntelliJ IDEA / Eclipse / STS / VS Code)
- Browser or Postman (to test the endpoint)
The following steps are involved in developing this hands-on experiment.
Step 1: Generate the Project
Step 2: Project Structure
Step 3: pom.xml (key dependency)
Step 4: application.properties
Step 5: Main Application Class
Step 6: REST Controller
Step 7: Run the Application
Step 8: Test the Endpoint
Step-by Step Application Development
Step 1: Generate the Project
Use Spring Initializr with:
- Project: Maven
- Language: Java
- Spring Boot version: 3.2.x (latest stable)
- Group: net.codejava
- Artifact: hello-spring-boot
- Packaging: Jar
- Java version: 17
- Dependency: Spring Web
Download the generated ZIP and extract/import it into your IDE.
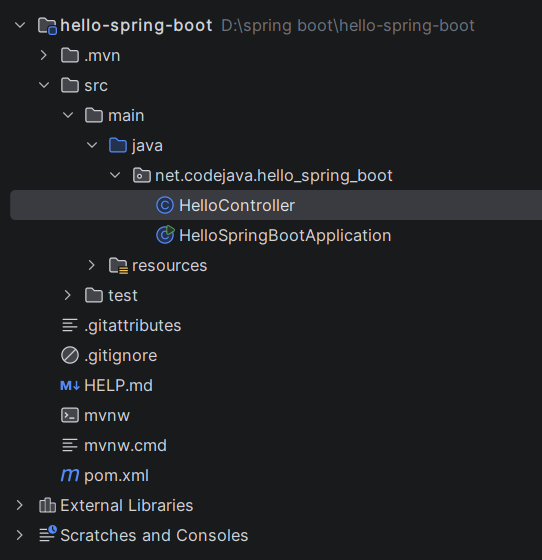
Step 2: Project Structure
Step 3: pom.xml (key dependency)
<dependency>
<groupId>org.springframework.boot</groupId>
<artifactId>spring-boot-starter-web</artifactId>
</dependency>
This starter pulls in Spring MVC, an embedded Tomcat server, and Jackson for JSON handling — everything needed for a REST endpoint.Code language: HTML, XML (xml)Step 4: application.properties
server.port=8080
spring.application.name=hello-spring-boot
Step 5: Main Application Class
package net.codejava.hello_spring_boot;

import org.springframework.boot.SpringApplication;
import org.springframework.boot.autoconfigure.SpringBootApplication;

@SpringBootApplication
public class HelloSpringBootApplication {

	public static void main(String[] args) {
		SpringApplication.run(HelloSpringBootApplication.class, args);
	}

}
Step 6: REST Controller
package net.codejava.hello_spring_boot;

import org.springframework.web.bind.annotation.GetMapping;
import org.springframework.web.bind.annotation.RestController;

@RestController
public class HelloController {

    @GetMapping("/hello")
    public String sayHello() {
        return "Hello Spring Boot!";
    }
}
- @RestController = @Controller + @ResponseBody, so the return value is written directly to the HTTP response body (as plain text/JSON) rather than resolved to a view.
- @GetMapping(“/hello”) maps HTTP GET requests at /hello to this method.
Step 7: Run the Application
click on the HelloSpringBootApplication.java and Run the HelloSpringBootApplication.java
Step 8: Test the Endpoint
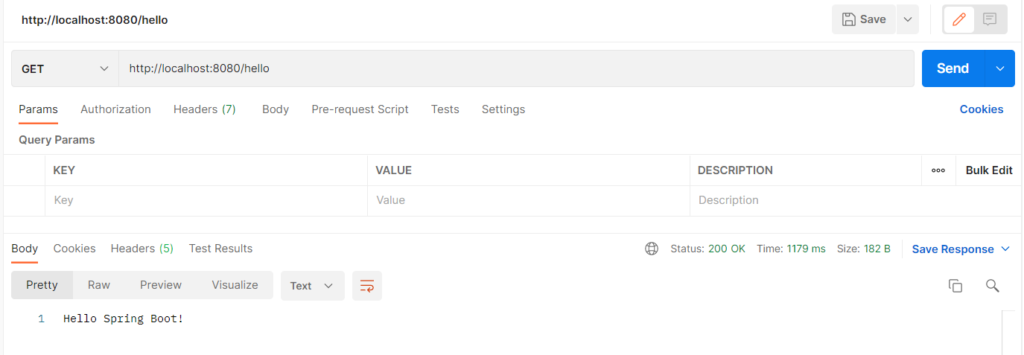
Open a browser or use Postman:
http://localhost:8080/hello
Output: