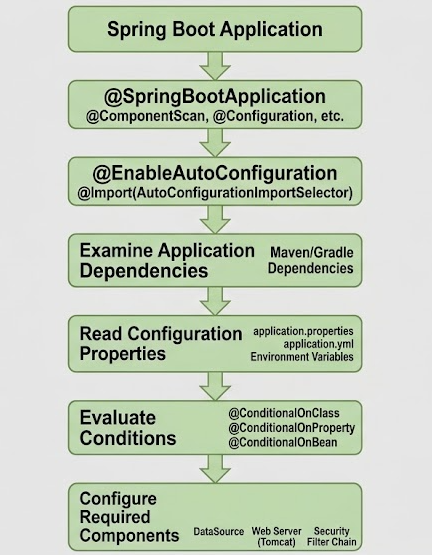
Understand how Spring Boot Auto Configuration automatically configures application components based on the dependencies available in the project and the configuration provided by the developer.
Auto Configuration reduces the amount of configuration that developers need to write manually. For example, when database dependencies are available and database properties are configured, Spring Boot can automatically configure the application’s DataSource and related database infrastructure.
What is Auto Configuration?
Auto Configuration is a Spring Boot feature that automatically configures application components based on the libraries available in the application and the configuration supplied by the developer.
For example, if an application contains database-related dependencies and appropriate database configuration, Spring Boot can configure the required database infrastructure automatically.
Spring Boot describes Auto Configuration as an attempt to automatically configure the application based on the jar dependencies that have been added.
How Does Auto Configuration Work?
What is DataSource?
A DataSource is a standard Java interface used for obtaining connections to a database.
In a Spring Boot database application, the DataSource acts as the connection layer between the application and the database.
Spring Boot’s SQL database documentation explains that DataSource configuration is controlled using external spring.datasource.* properties.
Hands-on Experiment: Create a Basic Spring Boot Application for Product Management System
The following steps are involved in developing this hands-on experiment.
Step 1: Generate the Project
Step 2: Project Structure
Step 3: pom.xml
Step 4: application.properties
Step 5: Create Entity Class
Step 6: Create Repository Interface
Step 7: Create Controller Class
Step 8: Main Application Class
Step 9: Run the Main Application Class
Step 1: Configure the Project on Spring Initializr
Go to start.spring.io and set:
- Project: Maven
- Language: Java
- Spring Boot version: 3.2.x
- Group: net.codejava
- Artifact: product-app
- Name: product-app
- Package name: net.codejava.productapp
- Packaging: Jar
- Java: 17
- Dependencies: Spring Web, Spring Data JPA, MySQL Driver
Click Generate to download the ZIP, then extract and import it into your IDE as a Maven project.
Step 2: Generated Project Structure
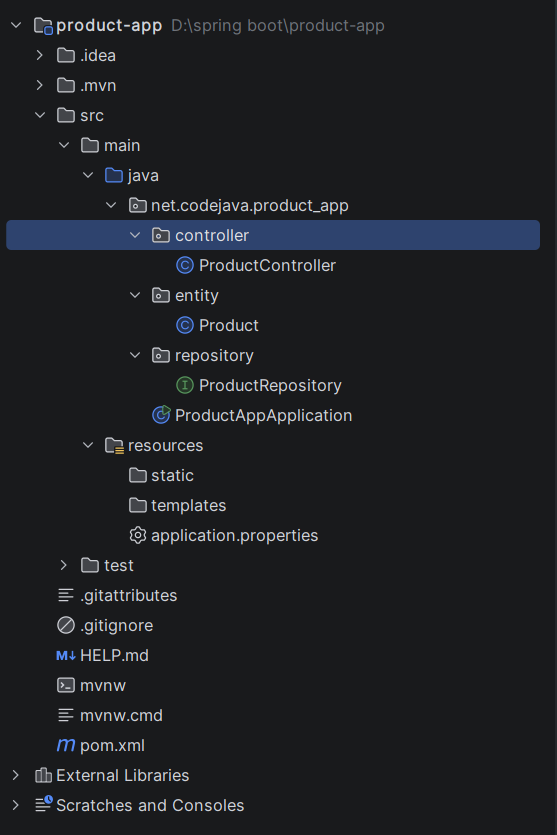
Step 3: Explore pom.xml
<?xml version="1.0" encoding="UTF-8"?>
<project xmlns="http://maven.apache.org/POM/4.0.0" xmlns:xsi="http://www.w3.org/2001/XMLSchema-instance"
	xsi:schemaLocation="http://maven.apache.org/POM/4.0.0 https://maven.apache.org/xsd/maven-4.0.0.xsd">
	<modelVersion>4.0.0</modelVersion>
	<parent>
		<groupId>org.springframework.boot</groupId>
		<artifactId>spring-boot-starter-parent</artifactId>
		<version>4.1.1</version>
		<relativePath/> <!-- lookup parent from repository -->
	</parent>
	<groupId>net.codejava</groupId>
	<artifactId>product-app</artifactId>
	<version>0.0.1-SNAPSHOT</version>
	<name/>
	<description/>
	<url/>
	<licenses>
		<license/>
	</licenses>
	<developers>
		<developer/>
	</developers>
	<scm>
		<connection/>
		<developerConnection/>
		<tag/>
		<url/>
	</scm>
	<properties>
		<java.version>17</java.version>
	</properties>
	<dependencies>
		<dependency>
			<groupId>org.springframework.boot</groupId>
			<artifactId>spring-boot-starter-data-jpa</artifactId>
		</dependency>
		<dependency>
			<groupId>org.springframework.boot</groupId>
			<artifactId>spring-boot-starter-webmvc</artifactId>
		</dependency>

		<dependency>
			<groupId>com.mysql</groupId>
			<artifactId>mysql-connector-j</artifactId>
			<scope>runtime</scope>
		</dependency>
		<dependency>
			<groupId>org.springframework.boot</groupId>
			<artifactId>spring-boot-starter-data-jpa-test</artifactId>
			<scope>test</scope>
		</dependency>
		<dependency>
			<groupId>org.springframework.boot</groupId>
			<artifactId>spring-boot-starter-webmvc-test</artifactId>
			<scope>test</scope>
		</dependency>
	</dependencies>

	<build>
		<plugins>
			<plugin>
				<groupId>org.springframework.boot</groupId>
				<artifactId>spring-boot-maven-plugin</artifactId>
			</plugin>
		</plugins>
	</build>

</project>
Step 4: application.properties
spring.application.name=product-app
# DataSource Configuration
spring.datasource.url=jdbc:mysql://localhost:3306/inventorydb
spring.datasource.username=root
spring.datasource.password=password
# JPA / Hibernate Configuration
spring.jpa.hibernate.ddl-auto=update
spring.jpa.show-sql=true
# Server Configuration
server.port=8080Code language: PHP (php)Step 5: Create Entity Class
package net.codejava.product_app.entity;

import jakarta.persistence.Entity;
import jakarta.persistence.GeneratedValue;
import jakarta.persistence.GenerationType;
import jakarta.persistence.Id;

@Entity
public class Product {

    @Id
    @GeneratedValue(strategy = GenerationType.IDENTITY)
    private Long id;

    private String name;

    private String category;

    private double price;

    private int quantity;

    public Product() {
    }

    public Product(String name,
                   String category,
                   double price,
                   int quantity) {

        this.name = name;
        this.category = category;
        this.price = price;
        this.quantity = quantity;
    }

    public Long getId() {
        return id;
    }

    public String getName() {
        return name;
    }

    public void setName(String name) {
        this.name = name;
    }

    public String getCategory() {
        return category;
    }

    public void setCategory(String category) {
        this.category = category;
    }

    public double getPrice() {
        return price;
    }

    public void setPrice(double price) {
        this.price = price;
    }

    public int getQuantity() {
        return quantity;
    }

    public void setQuantity(int quantity) {
        this.quantity = quantity;
    }
}
Step 6: Create Repository Interface
package net.codejava.product_app.repository;

import net.codejava.product_app.entity.Product;
import org.springframework.data.jpa.repository.JpaRepository;

public interface ProductRepository
        extends JpaRepository<Product, Long> {
}
Step 7: Create Controller Class
package net.codejava.product_app.controller;

import net.codejava.product_app.entity.Product;
import net.codejava.product_app.repository.ProductRepository;
import org.springframework.web.bind.annotation.*;

import java.util.List;

@RestController
@RequestMapping("/products")
public class ProductController {

    private final ProductRepository repository;

    public ProductController(ProductRepository repository) {
        this.repository = repository;
    }

    @PostMapping
    public Product addProduct(
            @RequestBody Product product) {

        return repository.save(product);
    }

    @GetMapping
    public List<Product> getProducts() {

        return repository.findAll();
    }
}
Step 8: Main Application
package net.codejava.product_app;

import org.springframework.boot.SpringApplication;
import org.springframework.boot.autoconfigure.SpringBootApplication;

@SpringBootApplication
public class ProductAppApplication {

	public static void main(String[] args) {
		SpringApplication.run(ProductAppApplication.class, args);
	}

}
Step 9: Run the ProductAppApplication
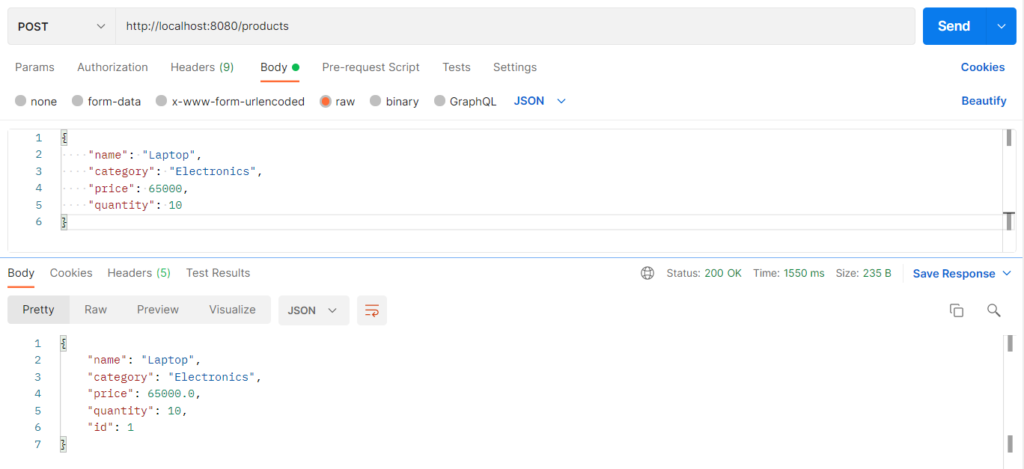
i. Add Product
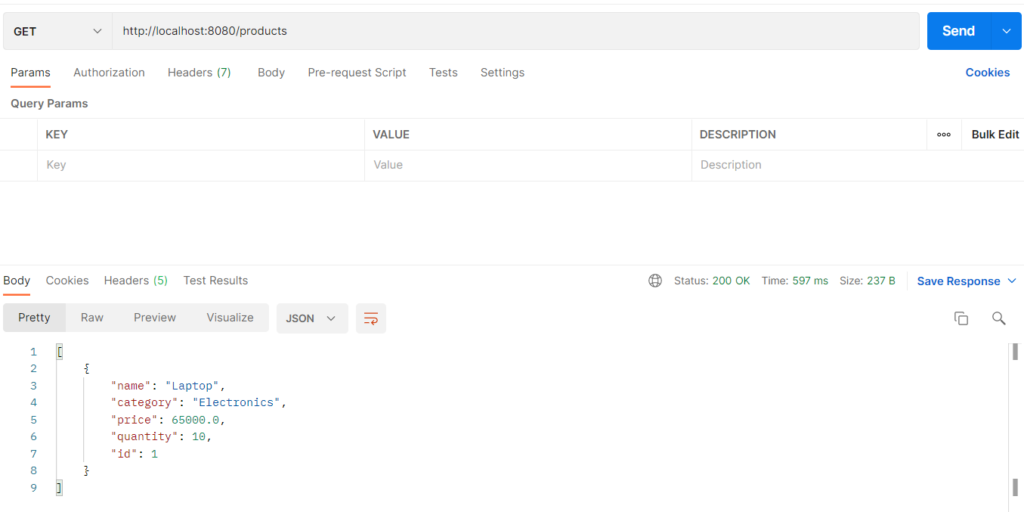
ii. Retrieve Products