Spring Boot Starters are convenient dependency descriptors that provide a predefined set of libraries required for a particular application capability. Instead of manually adding many individual dependencies and managing their compatible versions, developers can add a single starter dependency to the pom.xml file.
spring-boot-starter-webprovides dependencies required for developing web applications and REST APIs.spring-boot-starter-data-jpaprovides dependencies required for database access using JPA and Spring Data JPA.spring-boot-starter-testprovides libraries required for testing Spring Boot applications.
Starters simplify project configuration, reduce dependency-management effort, and help maintain compatible library versions through Spring Boot’s dependency management.
Common Spring Boot Starters
| Starter | Purpose |
|---|---|
spring-boot-starter |
Core Spring Boot functionality |
spring-boot-starter-web |
Web applications and REST APIs |
spring-boot-starter-data-jpa |
JPA and database persistence |
spring-boot-starter-jdbc |
JDBC database access |
spring-boot-starter-security |
Authentication and authorization |
spring-boot-starter-test |
Testing |
spring-boot-starter-validation |
Bean validation |
spring-boot-starter-thymeleaf |
Thymeleaf server-side templates |
spring-boot-starter-actuator |
Application monitoring and management |
spring-boot-starter-mail |
Email functionality |
spring-boot-starter-cache |
Caching support |
spring-boot-starter-websocket |
WebSocket applications |
Why Do We Use Starters?
Without starters, developers would need to identify compatible libraries individually.
Without Starter
Developer
↓
Find required libraries
↓
Add individual dependencies
↓
Check compatible versions
↓
Resolve transitive dependencies
↓
Configure project
With Starter
Developer
↓
Select Starter
↓
Maven downloads required dependencies
↓
Application development
Hands-on Experiment: Create a Basic Spring Boot Application for Employee Management System
The following steps are involved in developing this hands-on experiment.
Step 1: Generate the Project
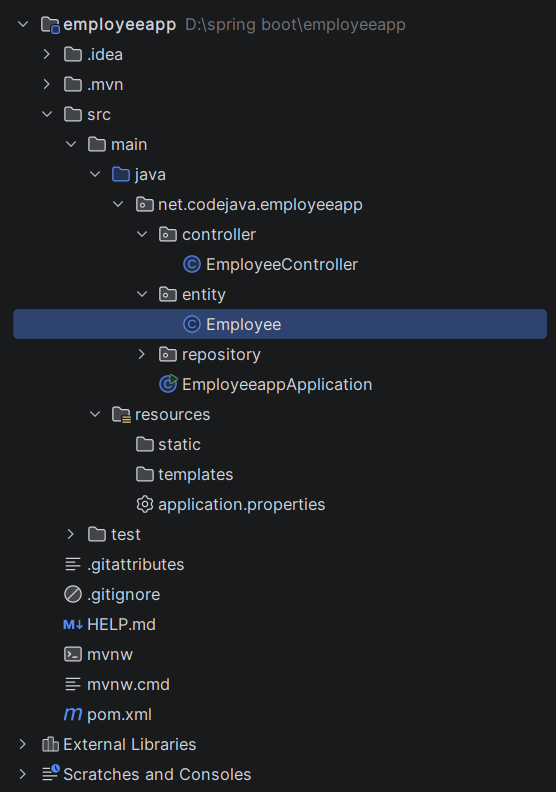
Step 2: Project Structure
Step 3: pom.xml
Step 4: application.properties
Step 5: Create Entity Class
Step 6: Create Repository Interface
Step 7: Create Controller Class
Step 8: Main Application Class
Step 9: Run the Main Application Class
Step 1: Configure the Project on Spring Initializr
Go to start.spring.io and set:
- Project: Maven
- Language: Java
- Spring Boot version: 3.2.x
- Group: net.codejava
- Artifact: employee-app
- Name: employee-app
- Package name: net.codejava.employeeapp
- Packaging: Jar
- Java: 17
- Dependencies: Spring Web, Spring Data JPA, MySQL Driver
Click Generate to download the ZIP, then extract and import it into your IDE as a Maven project.
Step 2: Generated Project Structure
Step 3: Explore pom.xml
<?xml version="1.0" encoding="UTF-8"?>
<project xmlns="http://maven.apache.org/POM/4.0.0" xmlns:xsi="http://www.w3.org/2001/XMLSchema-instance"
	xsi:schemaLocation="http://maven.apache.org/POM/4.0.0 https://maven.apache.org/xsd/maven-4.0.0.xsd">
	<modelVersion>4.0.0</modelVersion>
	<parent>
		<groupId>org.springframework.boot</groupId>
		<artifactId>spring-boot-starter-parent</artifactId>
		<version>4.1.1</version>
		<relativePath/> <!-- lookup parent from repository -->
	</parent>
	<groupId>net.codejava</groupId>
	<artifactId>employeeapp</artifactId>
	<version>0.0.1-SNAPSHOT</version>
	<name/>
	<description/>
	<url/>
	<licenses>
		<license/>
	</licenses>
	<developers>
		<developer/>
	</developers>
	<scm>
		<connection/>
		<developerConnection/>
		<tag/>
		<url/>
	</scm>
	<properties>
		<java.version>17</java.version>
	</properties>
	<dependencies>
		<dependency>
			<groupId>org.springframework.boot</groupId>
			<artifactId>spring-boot-starter-data-jpa</artifactId>
		</dependency>
		<dependency>
			<groupId>org.springframework.boot</groupId>
			<artifactId>spring-boot-starter-webmvc</artifactId>
		</dependency>

		<dependency>
			<groupId>com.mysql</groupId>
			<artifactId>mysql-connector-j</artifactId>
			<scope>runtime</scope>
		</dependency>
		<dependency>
			<groupId>org.springframework.boot</groupId>
			<artifactId>spring-boot-starter-data-jpa-test</artifactId>
			<scope>test</scope>
		</dependency>
		<dependency>
			<groupId>org.springframework.boot</groupId>
			<artifactId>spring-boot-starter-webmvc-test</artifactId>
			<scope>test</scope>
		</dependency>
	</dependencies>

	<build>
		<plugins>
			<plugin>
				<groupId>org.springframework.boot</groupId>
				<artifactId>spring-boot-maven-plugin</artifactId>
			</plugin>
		</plugins>
	</build>

</project>
Step 4: application.properties
spring.application.name=employeeapp
spring.datasource.url=jdbc:mysql://localhost:3306/employee_db
spring.datasource.username=root
spring.datasource.password=password
spring.jpa.hibernate.ddl-auto=update
spring.jpa.show-sql=true
server.port=8080Code language: JavaScript (javascript)Step 5: Create Entity Class
package net.codejava.employeeapp.entity;

import jakarta.persistence.*;

@Entity
public class Employee {

    @Id
    @GeneratedValue(strategy = GenerationType.IDENTITY)
    private Long id;

    private String name;
    private String email;
    private String department;
    private double salary;

    public Employee() {
    }

    public Employee(String name, String email,
                    String department, double salary) {
        this.name = name;
        this.email = email;
        this.department = department;
        this.salary = salary;
    }

    public Long getId() {
        return id;
    }

    public String getName() {
        return name;
    }

    public void setName(String name) {
        this.name = name;
    }

    public String getEmail() {
        return email;
    }

    public void setEmail(String email) {
        this.email = email;
    }

    public String getDepartment() {
        return department;
    }

    public void setDepartment(String department) {
        this.department = department;
    }

    public double getSalary() {
        return salary;
    }

    public void setSalary(double salary) {
        this.salary = salary;
    }
}
Step 6: Create Repository Interface
package net.codejava.employeeapp.repository;

import net.codejava.employeeapp.entity.Employee;
import org.springframework.data.jpa.repository.JpaRepository;

public interface EmployeeRepository
        extends JpaRepository<Employee, Long> {
}
Step 7: Create Controller Class
package net.codejava.employeeapp.controller;

import net.codejava.employeeapp.entity.Employee;
import net.codejava.employeeapp.repository.EmployeeRepository;
import org.springframework.web.bind.annotation.*;

import java.util.List;

@RestController
@RequestMapping("/employees")
public class EmployeeController {

    private final EmployeeRepository repository;

    public EmployeeController(EmployeeRepository repository) {
        this.repository = repository;
    }

    @PostMapping
    public Employee addEmployee(
            @RequestBody Employee employee) {

        return repository.save(employee);
    }

    @GetMapping
    public List<Employee> getEmployees() {

        return repository.findAll();
    }
}
Step 8: Main application
package net.codejava.employeeapp;

import org.springframework.boot.SpringApplication;
import org.springframework.boot.autoconfigure.SpringBootApplication;

@SpringBootApplication
public class EmployeeappApplication {

	public static void main(String[] args) {
		SpringApplication.run(EmployeeappApplication.class, args);
	}

}
Step 9: Run the EmployeeApplication
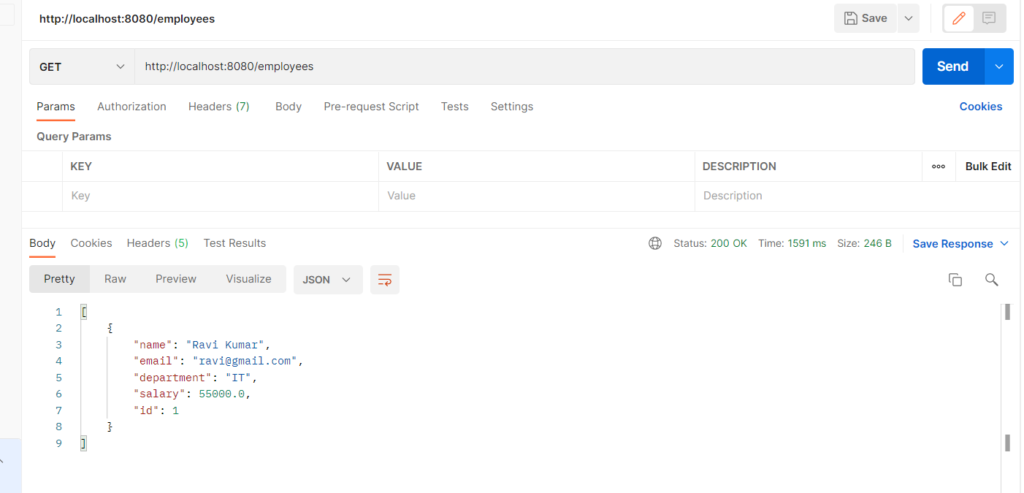
i. Adding Employee
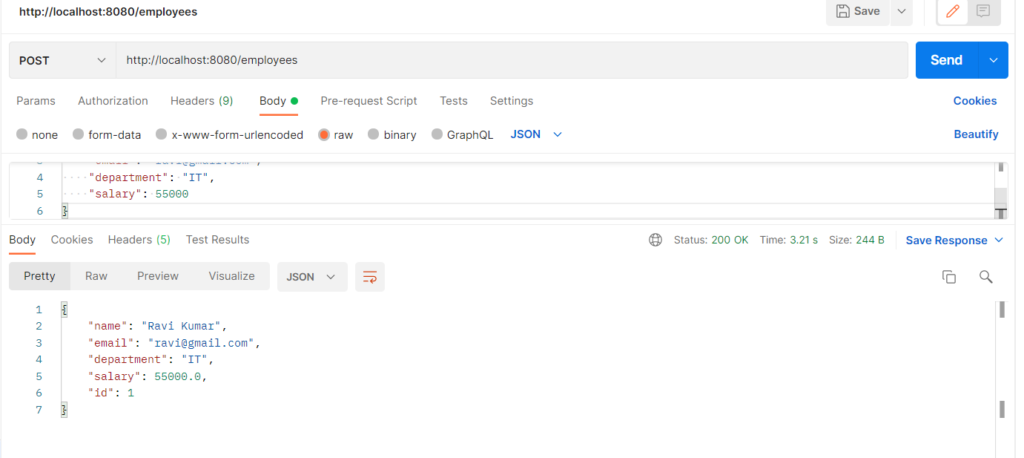
ii. Retrieve Employees